Personal Update

I’m in the beginning steps of personal reinvention. I’ve been floundering for a while no longer feeling productive or useful at home. Friends of mine know that I considered enlisting in the military to solve my problems. It is not ruled out, but I am no longer actively pursuing that route. After a long talk with a dear friend and mentor, I have decided to reassert my efforts to becoming a helper.

Now that I’ve had help focusing, there are many options available to me instead of drumming up business on my own. In a traditional sense a helper is usually called a personal or administrative assistant. That’s one route I’m pursuing so if you need an assistant or your office does or just someone you know might, please drop me a line. Another option I’d like to pursue is volunteering my time and talents to a project, group, or organization that I like and needs help. From this I hope to learn and grow as well as make useful contacts.

My first step has been to reinvent my resume. A traditional, chronological resume is not much help when I am trying to start something new. With help, I decided I needed to list my skills, talents, and experience in a way that shows I would be an asset to any team. I came up with a modern photo resume that starts with a smile and my strengths. I’m sure it won’t appeal to typical HR types, but I’m inspired by my community to not be typical.

I’m still trying to figure things out, but I definitely feel more focused and confident than I did a week ago. I appreciate all of you who have helped me out during this rough time.


Information Overload

If you’re reading this, it’s pretty safe to assume that it’s from some form of RSS reader. Many people I know get the majority (if not all) of their news in this way. I know I use it to learn about crafts, design, what’s going on with friends, and what’s going on in my community. The first two items frequently have pictures or tips or bits of information that I’d like to keep and refer back to later. I’ve used NetNewsWire and Google Reader to keep up with these things by adding them to my clippings or starring the items.

My problem today, however, is that I’m ready to look through some of this information again but don’t know where to start. I have clippings in NNW organized into folders for easy reference but my starred items in Google Reader are not organized in any way. I even have lots of information stored in delicious for “future reference.”

Do any of you have this problem? Do you try to save all the information in one place? Is it organized at all?

I plan on making the move back to NNW because my clippings can be organized into folders and archived on my computer. I’ll tackle my delicious problem some other day. At least I’ve tagged those pretty well.


Final steps

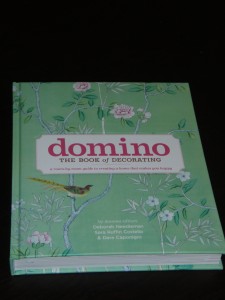
This is part three to chapter one of the Domino book of decorating.

These next few steps really go hand in hand. While you research pricing and where to buy, you should save your swatches and clippings to put together a whole design scheme. This ideally would be a single sheet of paper with all of your colors, textures, theme, and major elements. Based on your scheme and budget, you can then make your decorating schedule. Remember the order things should be done in. I suggest you paint the walls first, then move in the furniture, and finish with the accents and decor. If you agree, your list should reflect that order. While your list should help keep you in check and prevent you from feeling overwhelmed, don’t think it’s set in stone. If some unexpected money comes in, get that more expensive piece of furniture you might have been saving for just don’t move it in yet.

Research

If you’ve been following along with the steps, you’ve probably done a lot of research to find inspiration and determine your style. This step is much more specific. This is where you do research on a specific room. You’ll be looking for specifics. If you’re working on an office space you’ll most likely be looking for desks, organization, and lighting as well as decor elements such as wall coverings, floor coverings, and art. This is also the step to go back to that inspiration and find where to buy and how much items will cost. To keep things organized, continue using dropbox for images and files but start bookmarking links so you know where to go when you have money in hand. Google offers bookmarking if you already use it, but if you need or want to share your finds, I suggest delicious. Not only does delicious save the link online but you can make your own title, notes, and add tags for that extra organization. I find the notes especially helpful when I’ve found an item in different online stores for different prices. I put the price in a note so I don’t even have to click the link until I’m ready to buy. You can check mine out here.

Create a design scheme

This is also known as a mood board. In doing a quick search to find an online tool, it seems there are many. I plan on checking out three or four and writing an update in the future. The purpose of this step is to narrow down your options and see how everything looks together. The example in the book is for a living room. It includes three paint colors labeled with the name of the paint and surface they’ll be covering. It also has pictures of seating and a swatch of fabric each piece will be covered in. It has a picture of a lamp as well as a rug. Your design scheme can be just as simple or include more details. I really like tangible mood boards especially since fabric and paint are probably selected in person rather than online. It would be quick work with a scanner, however, to get these items digitized. I have wonderful ideas for my client’s kitchen and am looking forward to trying out this step!

Make a decorating schedule

This is basically a to do list of next steps. It’s good to have an overall plan, but I’ve found that smaller steps after something is completed or worked on is easier to follow. This is something that’s very fluid and easily changed. Again, I suggest a basic schedule of walls, furniture, details. The example in the chapter goes along with the design scheme: order paint, order sofa in correct fabric, order chairs, and so on. Your list can be as general or detailed as possible but should be updated often. For an online checklist, I use tadalist. You can have many lists (say one for each room) and even share checklists with other users. They even have a clever way of quickly showing how close you are to finishing a list.

Here’s the checklist again:
  1. Find inspiration
  2. Determine your style
  3. Consider how you’ll use a room
  4. Assess your stuff
  5. Draw up a floor plan
  6. Set a budget
  7. Research
  8. Create a design scheme
  9. Make a decorating schedule

I think you’ll repeat each of these steps but cater to whatever space you’re working on. For instance, when looking for inspiration while planning an office space, you should search for images of offices. Furthermore, your design style can change a bit based on the space especially if it’s closed off. Each step will be similar but different based on where you’re working.

I’m currently working on finishing up an office space for a client and hope to take what we’ve done through these steps and try out some of the suggested tools.

Thanks for reading. If you’d like to connect, follow me on twitter here or leave a comment below.
 

Next steps

This is part two of three for chapter one of the Domino book of decorating. This will cover steps four through six.

Assess your stuff

The book suggests photographing everything, sorting those pictures, and measuring the items you plan on keeping. The photographs are to help you filter your items to see if they serve the purpose of a room and your design style. If not, it’s an item you can sell or give. Domino suggests sorting your pictures into keep, change, give, and sell to help with the process. I like the idea of pictures of everything because it can also help you see everything you’re going to keep and put different items together to accomplish your goal for a room. It’s an easy way to bring that lamp from the bedroom into the office for a great, new look. The final step to measure is really a no brainer. Don’t forget to measure your art and pictures frames to make sure they’ll fit in your wall space.

I have not actually done this step so I’m not sure how well these tool tips will help but for keeping pictures online, I use Flickr. I have a pro account which allows unlimited organization (sets/collections) and uploads. The free account allows you to show 200 photos and upload 100MB of photos per calendar month (which means it resets at Midnight Pacific on the first of each month). Because of these limits, I’m not sure how long it would take or how difficult it would be to get all of your pictures online. I do like what Flickr offers in terms of organization. I highly suggest the use of tags to keep items organized. You can tag items with one of the four* sorting options above as well as categorizing them into furniture, art, color, size, etc. I suggest refraining from using room tags (living room, bedroom, office) until you are actively working on that room and know that piece of furniture or art is going into that room. You can add descriptions to your photos as well. This is where you should add your measurements of items. If you want to get really spiffy or maybe the item is an odd shape, you can add a note to the photo. Here’s my example.

There are many other online photo storage options so feel free to browse around and try things out for yourself. These are just my tips for storing and organizing online.

*Uploading the give/sell items might seem silly but Flickr gives you a permanent link for those pictures which would make listing easier.

Draw a floor plan

A free personal account at floor planner lets you have one plan to lay out your home, apartment, or condo. It even allows you to view in 3D. They offer other products and a demo, but I need to measure my space before I can really use this. There’s more to just the floor plan, however. The layout of the items in the room is just as important as any features (fireplace, picture window, etc.) you may want to highlight. The book suggests you map layout options to help you figure out what’s important and visually pleasing.

Set a budget

This step is going to be very difficult for me because I really don’t have any money to spend. I hope by the time I reach this step in a room, I’ll know what I want and can then make a list and price it out. This will allow me to prioritize, save, and look for sales or thrift items. While I am working on researching, I’ll make sure to keep a list of prices and where to buy so that a budget is kept in mind.


Getting Started…

…is the title of the first chapter of the Domino book of decorating. There are nine steps that I would like to break down into three posts. This is mostly to keep each post relatively short but to also give me more time to complete each of the steps. Here is an overview of the steps:

  1. Find inspiration
  2. Determine your style
  3. Consider how you’ll use a room
  4. Assess your stuff
  5. Draw up a floor plan
  6. Set a budget
  7. Research
  8. Create a design scheme
  9. Make a decorating schedule

Find Inspiration

I’ve spent a lot of time on this important first step. I have been looking through books, magazines, blogs, movies, stores, and more trying to find things that appeal to me. For anything that I’ve found online I’ve been using Dropbox. You get 2G of storage free with the ability to earn more by referrals and the like. I’ve found it highly useful with an interior design client of mine so I set up one folder for my likes and one folder for things I think she would like. I am continually on the lookout for things that appeal to me. When saving and naming a picture, I make sure to use the title to remind myself what I was drawn to. This is to help with the next step.

Determine Your Style

I’ve started this process by going through the pictures in my Dropbox and blurting out what I like about the picture. I don’t have nearly enough pictures to dwindle down to a single style or even a general theme. My words include classic, modern, nature/natural, bright colors, uniqueness, and balance. That says to me that I don’t have just a single design style. Luckily I have different spaces that I can do different things with. To help with my brainstorming, I signed up for a free account at mind meister. It’s quick and easy to use with a slight delay to save/update what you just typed so if you’re on too much of a roll it might just slow you down. It’s completely online with the capability of sharing your mind map and having collaborators edit it. I’m not sure how much I’ll actually use it, but it served this purpose nicely.

Consider Room Use

The next steps (3-9) are really for when you’ve picked out the room you’re going to do, but it is a good idea to start thinking about your house as a whole and what each room is going to be used for. For example:

  • Is the second bedroom a guest room solely or a TV room as well?
  • Is there more than one person using this office? Is it for meetings?
  • Also think about things that don’t work in a room. Does anyone ever sit in this chair?

You will probably see these steps repeated often as I go through this process with you. I would love to hear any ideas you might have or if you’ve done anything similar. Please, follow me on twitter here or leave a comment below.


Coat Racks

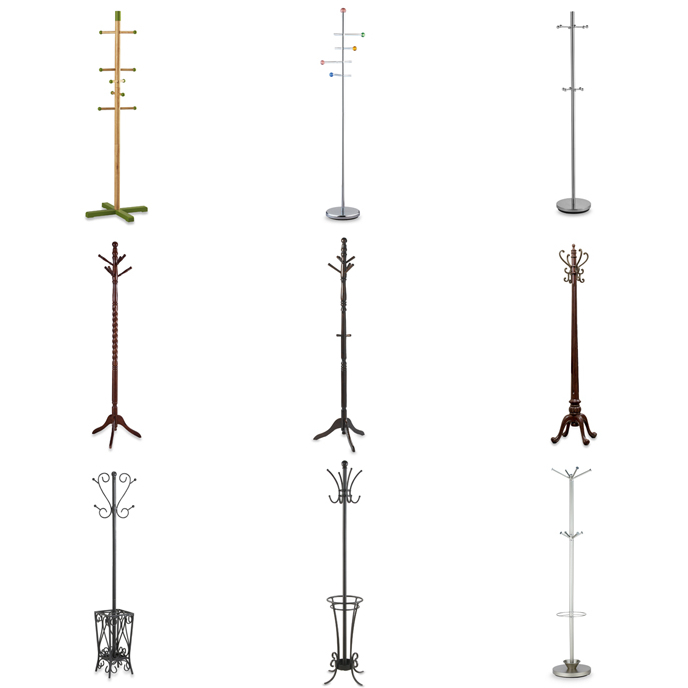
I was out shopping the other day and noticed that stores such as Ross and Bed, Bath, & Beyond actually carried coat racks. They weren’t modern or trendy but a black classic coat rack with an umbrella stand built in. However, when I went searching BB&B for the above pictures I found many different varieties ranging from $30 to $160. Now that I’ve spent even more time looking, there’s a wide variety of styles from classic to modern and trendy to simple. Some of them seem too pretty to cover with boring old coats!

I’ve always been a fan of coat racks, especially while I was living in the northeast and didn’t have a coat closet. There’s no great space in my home for a coat rack to be used for coats but how about a hat rack or a way to plan outfits? I really like the racks with hooks in the middle or continually moving down for a hat display or woman’s valet.

The more I think about other uses for a coat rack, the more I really want one.

What do you think? Do you like them? Can you think of other atypical uses for a coat rack? I’d love to hear in the comments below or talk to me on twitter.


My house, my home

One of my resolutions for this year is to hang on my walls items that I already own. This includes pictures, art, and shelving. One of my life goals is to decorate my home. I’m pretty sure it will be impossible for me to say that decoration is ever complete because I like the idea of changing things up, but my goal is to get major design ideas and furnishings in place so that I’m happy in my home.

In my hope to accomplish these goals, I bought the Domino book of decorating. It’s written to start with the basics of figuring out what you like and go through your home room by room. I plan on reading the introduction then diving into the chapter of what I’m interested in doing next.
I’d like to use my blog to document my progress through the house and Readernaut to document my progress through the book. I hope to post at least once a week.

My goal with this book is to have plans for a given space as well as accomplishing my 2010 goal of hanging items I already have in said space.

I also plan on using as many online tools as possible even though I love the tangibility of a notebook with all of my ideas. I’ll be including these tools as I go along and will probably do a comprehensive list at the end of this adventure.

Do you have any tools that you use that might help me to organize floor plans, pictures, thoughts or ideas? If so, please leave a comment below or follow me on twitter here.


Progress Report

I just wanted to share a quick update on my goals for 2010. One of them was to bring in about $1,000 a month without going back to traditional employment.

I’m ecstatic to share that I have accomplished that goal at least until the end of the school year. I have enough coaching classes as well as a great babysitting gig to work only three days a week but bring in exactly $1,000 a month.

I can only hope things work out just as well in May when the school year comes to a close.


Re:fresh Design Studio Giveaway

I have an off schedule post to let all of you know about a giveaway on one of the design blogs that I read. Re:fresh Design Studio has recently updated their website with a fresh new design.

I’m letting all of my readers know that if you’re interested in great ideas from a gal that’s fun to read, you should definitely check out the Re:fresh blog.

Just so you know, I’m hoping to get ideas for my home office/craft room. I have plenty of ideas for the shared spaces and guest room but when it comes to my own, I’m stumped!


Finding the balance between responsibility and passion.

Photo by hades

I’ve been spending most of my afternoon catching up on my very neglected RSS reader. I also spent time today listening to a couple of Phoenix creatives talk about their “alter egos.”

The part of their message that had the greatest impact on me was that it’s okay to hold a regular job. It’s even okay for that job to be something completely unrelated to your passion or “alter ego.” They spend their days doing design for financial institutions and their nights creating funny and beautiful other worlds, characters, and stories. They look at their day jobs as funding for their dreams and the responsible choice in supporting their families. The fact that their jobs don’t tap too much into their creative brains helps because they don’t come home feeling drained.

Although I eventually want my day job to be my dream job and fulfill my passion, I have had the opportunity to start now. My dream job is to teach elementary students. Since August of ’09, I have been coaching kindergarten through 6th grade students in cheerleading and gymnastics. It pays fairly well per hour but with only two to three classes a week plus commute, I barely break even (monetarily). This lack of decent income has become a bit of a burden. I’m willing to give up this opportunity for now, but I’m hoping I don’t have to.

This brings me to a particular post I read on The Art of Great Things that says I don’t have to feel guilty about finding or holding a typical, scheduled position. It also states that it is the responsible thing to do for most people. This post is also about the work-life balance and again relates to the talk I heard earlier. By working in a regular job, I will have the funding, time, and energy to pursue my coaching opportunity.

I’m still on the search for the job that will fit my schedule. I know that even if I have to settle for a full time J-O-B; I can find other ways to fulfill my passion.